Wednesday, January 27th, 2010
*cough cough hack hack*
I’ve been a bad blogger – because after much time and effort getting the two Route 66-themed art works finished and ready for display on Jan.15, I promptly got sick. I usually get some kind of respiratory infection in the winter, and I was just glad that this one held off until both gallery shows were open… but, dang! I’ve had little energy for the tons of catching up I have to do, this incessant cough is keeping me (and probably my poor new tenant) awake at night, and anyone around me is ready to strangle me with all this hacking – in fact I’m about ready to do it myself. I finally resigned myself to antibiotics today, so hopefully this nasty week-and-a-half-long cough will hit the road already.

installing the time lapse Route 66 photo grid at the AGW (photo credit: Craig Wells)
Speaking of the road, I’ve been spending a lot of time with the over 60,000 (!) dashboard camera images I amassed on the recent Route 66 trip. The time-lapse stuff is on display at two Windsor galleries in two different formats right now, and I’ll describe more about that in my next post. I realized that I never got around to really writing about the time-lapse camera and process much while I was traveling. Allow me to fill you in! (A word of caution: this may really bore non-photographers. But it’s kinda cool, so it might not.)

Hamtramck's Whiskey in the Jar
First off: like many insane-but-really-cool ideas, the whole time-lapse thing came about over cheap beers in a Detroit dive bar.
I am a member of “Hatch”, a Hamtramck art collective. Hamtramck is a little Polish enclave of a city literally in the middle of Detroit – Detroit surrounds it on all sides (there are two communities within Detroit like this: Hamtramck and Highland Park). Hatch purchased the old abandoned police station from Hamtramck, and we’re renovating it into artist studio and gallery spaces. So one Sunday afternoon after doing demolition at the Hatch building, Scott, Ken and myself, covered with dust and crap, rolled into a local watering hole for $1.50 PBRs. (God Bless America! You can’t find a deal like that in my country!!)
I was telling the guys about my Route 66 trip plans, and one of them said, “wouldn’t it be neat if you could snap a picture once in awhile as you drove?” This got us talking about mounting a camera to the car. Which got me looking into dashboard cameras. Which got me researching time-lapse photography, which put me onto intervalometers. I need to thank my former Scarborough Cable colleague Paul Steinberg for his help with that: Paul recommended Pclix, which is what he uses for his time-lapse photography. Pclix intervalometers are made in Toronto by Paul Cormack, who does an outstanding job of customer service. (That Paul was also amazingly helpful in this whole endeavor, so I need to give him a big shout out as well.)

Pclix intervalometer
The plan was this: use the intervalometer to automatically take a photo every few seconds as I drove all across Route 66 – then later put all of those photos into a video time-lapse sequence of the whole Route. It would be a way to show what you see as you drive down Route 66, but without requiring the two weeks to do it. Also, since it would be jpegs taken with a reasonably high-resolution D-SLR camera, the quality and clarity you’d see if you pressed “pause” on the video playback would be much higher than if I just used a consumer video camera with a time-lapse mode (something I briefly considered, since it would have been easier).
After ordering the Pclix and doing more research, I discovered something I had no clue about: did you know that digital cameras have a life span? Yup, the shutter mechanism on your D-SLR isn’t meant to click indefinitely. Each camera manufacturer has an estimated shutter click lifespan, and you can’t expect your camera to last much longer than that (although sometimes they do). The Pentax *ist DL I planned to use on the dashboard (which was my backup D-SLR body) had an estimated shutter life span of 36,906 clicks (average number of actuations after which the shutter died, according to this camera shutter life expectancy database). Since my math estimates told me I would be taking many more pictures than that for this project, and since my camera already had thousands of actuations logged on it, I figured I’d better get me a backup. I would be driving across the country, and if the thing died during the trip, getting a used one on the road would be difficult, time-consuming and more expensive. I scoured eBay and craigslist and other assorted websites, and eventually found one for about $300 in Toronto. Still more than I wanted to pay, but it had to be done and it wasn’t a bad deal.
Now we needed some way to mount the thing.
 There are many ways to do this, and many good products out there. I was going to use Filmtools, but I would have preferred something cheaper and local – cheaper because I no longer had a paycheck coming in, and local in case it wasn’t just right and I may need to return it. I didn’t have the luxury of time to be shipping products back and forth to LA. Turns out my local Henrys camera store had a suction cup mount for just under $100 that they thought would do the trick. It actually did hold the camera up pretty well, and the suction cups were stronger than I thought. I took it for a spin.
This unit presented a couple of challenges for me. First off, there was no way to quick-release the camera off the thing. I drive a Jeep with a soft top, and stealing things out of it is way too easy. I would need a system that allowed me to remove the camera quickly when going into stores, going shooting, etc. This one needed me to spin the camera around on the little screw on the mounting plate to secure and remove it. It was way too annoying to do. Secondly, as I said, I drive a Jeep. As I believe I’ve mentioned in a previous post, as much as I LOVE my Jeep, a smooth ride it is not. The bouncing around of the Jeep was a bit too much under the weight of the camera, and over larger bumps, it tended to shift position a fair amount. Also, the suction cups were sort of getting in the way of the shot.

"THE SILVER pod" bean bag SLR camera mount
During a later visit to a different local camera store, Photo Outfitters (great place, great guys, great service), I noticed that their “THE pod”s were on sale. These are squat, cylindrical bean bags with a mounting screw attached to them, designed to be used in place of a tripod. I always thought they were kind of neat, and here they were on sale. The thing about the bean bag pod, is ballast. The Silver pod model could really hold the weight of my camera pretty well (even has straps and Velcro to hold stuff in place) – and gravity would be working with me, not against me, as I drove. The camera could actually just stay attached to the pod the whole time, and I could just remove the entire assembly from the dashboard and store it in the baby “trunk” of the Jeep when I needed to get out. This solution was also less than half the price of the suction cup mount.
The problem? Registration. I wouldn’t be able to accurately reproduce the position of the camera shot each time the camera was moved (and, as I drove, it would shift a tad as well). I decided, in the end, that perfect registration wasn’t that critical, and that if the angle wasn’t exactly the same throughout the whole trip, it wasn’t the end of the world. “Fix it in post”, as we say in TV land.
OK, I had my mounting solution. I had my interval solution. Now I needed to define the interval.
I thought about this, and discussed it with photo friends, at great length. After doing a couple of driving tests, I found that a good rate of shutter clicks to create a time-lapse driving sequence that was easy to watch and was somewhat smooth, was about 1 exposure every 2 seconds (played back at 30 frames per second, normal video speed). Here is one of the tests, taken at 1 click every 2 seconds:
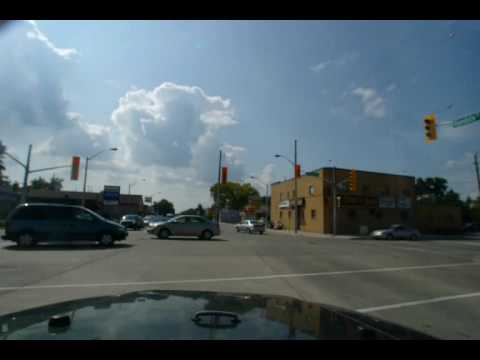
But when I did the math and estimated how long the trip would take me, I came to the conclusion that at that rate, the video of Route 66 might be over 3 hours long. I didn’t expect that anyone would have the intestinal fortitude to stare at a jumpy, fast-moving screen for that long. I remember watching tortuous experimental movies at film school, and I didn’t want to inflict that pain on anyone else. Still, the smoother the video, the better people would be able to actually SEE what lies along Route 66. (Even better: 1 frame every second… but again, waaaaay too long of a video – and talk about a lot of images! I would have had hundreds of thousands of photos if I did that. Below is a short example of a test at 1 frame every second. Quite smooth!)
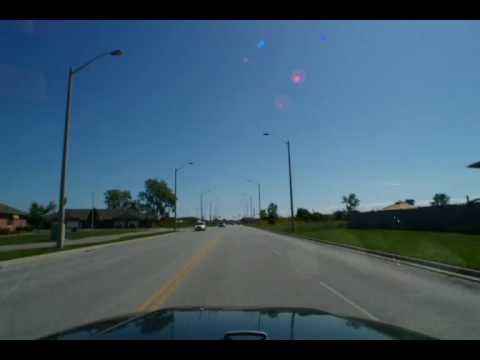
Speaking to my photographer friend Chris Schneider about it, he said that I should totally speed it up and shoot like 1 frame every 5 seconds, so that you’d be able to see the landscapes change REALLY fast. To him, that would be interesting and would keep him watching. I ended up decided to split the difference. I chose to shoot 1 exposure every 3 seconds if I was driving through a city or any landscape that changed quickly – then 1 every 5 seconds for those long, straight stretches where the horizon looks the same forever. I would also use 5 when Route 66 follows the interstate (since the interstate is the enemy of Route 66, and isn’t that interesting in general, anyway). Once every 4 seconds when at stop lights, or other times when I wasn’t sure whether to do 3 or 5. The Pclix has a little dial on it, so changing the rate on the fly was very easy. (Plus it has a handy carrying strap that enabled me to hang it from the rear view mirror.)

the gear setup for doing time-lapse shooting while driving
Power.
You need to power your camera as you shoot. My *istDL takes 4 AA batteries, and those do NOT last long when shooting ongoingly like this. Fortunately, the new-to-me backup body that I bought came with an AC adaptor, and I could plug that into the car lighter with a power inverter. All set. (NOT, in fact… after I got on the road, I discovered that the adaptor didn’t work, even though I did test it at home before I left! Then I bought an adaptor at Radio Shack when in Illinois it became clear that my batteries were going to die twice a day. Which also didn’t work. So I stocked up on cheap AA batteries at Radio Shack. Those didn’t work either! <apparently I needed Alkaline batteries, not regular ones> It took a long time, but eventually I found a universal AC adaptor at a Best Buy in some town, that actually had an end that fit my camera. Awesome, especially because the package was already opened and they were selling it at a massive discount.)
All set now, right? Nope.
STORAGE. Have you ever tried to shoot thousands of pictures in one sitting? They won’t all fit on your average 1-2GB SD camera card.
No problem, right? I’ll just buy me one of those new fancy 8GB cards for $25 at one of the WalMarts where I camped. Done.
Nuh-uh. My camera is an older model. Apparently older cameras that came out before these new fancy high-capacity SD cards appeared on the scene don’t even know how to read the things, let alone record photos to them. But wait! There is something known as a firmware upgrade. You can actually download a program from the internet, put it on an SD card, put the SD card in your camera, and the camera’s software will upgrade itself to be able to read the new cards! Done! Sweet.
 Then there was the realization that I sometimes had reflections of the gear in the windshield (namely the POD logos all over the straps and bean bag), which showed up in the images. So I started wrapping black socks around the logos. Eventually I covered the whole camera and pod with the black bag that I use for loading and unloading my infrared film in total darkness, with just the lens sticking out. (…oh yeah: lens! I used my 14mm wide angle Tamron lens, to show as much of the view as possible. Not a lens I use that often, but it sure came in handy for this project.)
I won’t bother getting into other issues like file size, ISO rating, shutter and aperture speeds, or white balance.
Such was the technical setup and learning curve I went through to get this thing going. It took, I dunno, about a week on the road to work out all these hiccups… but eventually I got it all working. I’m nothing if not persistent.
OK, I apologize for getting all tech-y here. I know I’ve bored many of you but believe it or not, this post will be very useful to anyone else trying to achieve something like this. Wish I had read one like it before I started out!
Now, back to my regularly-scheduled coughing fit.
Tags: AGW, art gallery, Artcite, dashboard, Hamtramck, Hatch, Here in my Car, intervalometer, Pclix, Pentax, the POD, Time Lapse
